Using Zappa deploy in Lambda & use Aurora Serverless
We will see how to deploy a Django application onto AWS Lambda using Zappa and use AWS Aurora-Serverless as the DB.
AWS Lambda is a serverless computing platform by amazon, which is completely event driven and it automatically manages the computing resources. It scales automatically when needed, depending upon the requests the application gets.
Zappa is a python framework used for deploying python applications onto AWS-Lambda. Zappa handles all of the configuration and deployment automatically for us.
And Aurora Serverless is an on-demand, auto-scaling Relational Database System by Amazon AWS(presently compatible with only MySQL). It automatically starts up & shuts down the DB depending on the requirement.
Install and Configure the Environment
Configure AWS Credentials
First, before using AWS, we have to make sure we have a valid AWS account and have the aws environment variables(access-keys).
then, create a folder at the root level
$ mkdir .aws
Now, create a file called credentials and store the
aws_access_key_id and aws_secret_access_key. To find these
access credentials
- Go to IAM dashboard in AWS console
- Click on Users
- Click on your User name
- Then, go to Security credentials tab
- Go down to Access keys
- Note down the
access_key_id.secret_access_keyis only visible when you are creating new user or when creating a new access key, so you need to note down both the access_key_id and secret_access_key at the time of user creation only or create a new access key so that we can get both the keys.
###~/.aws/credentials
[default]
aws_access_key_id= XXXXXXXXXXXXXXXXXXXX
aws_secret_access_key=XXXXXXXXXXXXXXXXXXXXXXXXXXXXXXXXXXXXXXXX
Go to Django app
After setting up the aws credentials file, now let us go to the django project, here we used Pollsapi (https://github.com/agiliq/building-api-django) as the django project. Now go inside the pollsapi app in this repo.
Create a virtual env for the project and do
$ pip install -r requirements.txt.
Install & Configure Zappa
Next install zappa
$ pip install zappa
After installing Zappa, let us initilise zappa
$ zappa init
which will ask us for the following:
- Name of environment - default ‘dev’
- S3 bucket for deployments. If the bucket does not exist, zappa will create it for us. Zappa uses this bucket to hold the zappa package temporarily while it is being transferred to AWS lambda, which is then deleted after deployment.
(Its better to create an S3 bucket, which we will later also use to host the static files of our application)
- Project’s settings - (which will take the ‘pollsapi.settings’)
Zappa will automatically find the correct Django settings file and the python runtime version
$ zappa init

███████╗ █████╗ ██████╗ ██████╗  █████╗
╚══███╔╝██╔══██╗██╔══██╗██╔══██╗██╔══██╗
  ███╔╝ ███████║██████╔╝██████╔╝███████║
 ███╔╝  ██╔══██║██╔═══╝ ██╔═══╝ ██╔══██║
███████╗██║  ██║██║     ██║     ██║  ██║
╚══════╝╚═╝  ╚═╝╚═╝     ╚═╝     ╚═╝  ╚═╝

Welcome to Zappa!

Zappa is a system for running server-less Python web applications on AWS Lambda and AWS API Gateway.
This `init` command will help you create and configure your new Zappa deployment.
Let's get started!

Your Zappa configuration can support multiple production stages, like 'dev', 'staging', and 'production'.
What do you want to call this environment (default 'dev'):

AWS Lambda and API Gateway are only available in certain regions. Let's check to make sure you have a profile set up inone that will work.
Okay, using profile default!

Your Zappa deployments will need to be uploaded to a private S3 bucket.
If you don't have a bucket yet, we'll create one for you too.
What do you want to call your bucket? (default 'zappa-xpxpcmpap'):zappa-staticfiles1234

It looks like this is a Django application!
What is the module path to your projects's Django settings?
We discovered: pollsapi.settings
Where are your project's settings? (default 'pollsapi.settings'):

You can optionally deploy to all available regions in order to provide fast global service.
If you are using Zappa for the first time, you probably don't want to do this!
Would you like to deploy this application globally? (default 'n') [y/n/(p)rimary]: n

Okay, here's your zappa_settings.json:

{
    "dev": {
        "django_settings": "pollsapi.settings",
        "profile_name": "default",
        "project_name": "pollsapi",
        "runtime": "python3.6",
        "s3_bucket": "zappa-staticfiles1234"
    }
}

Does this look okay? (default 'y') [y/n]: y
After accepting the info. A file zappa_settings.json gets created
which looks like
{
  "dev": {
    "django_settings": "pollsapi.settings",
    "profile_name": "default",
    "project_name": "pollsapi",
    "runtime": "python3.6",
    "s3_bucket": "zappa-staticfiles1234"
  }
}
Now, before deploying we have to mention the aws_region(where we
want ot deploy the django app). Make sure that you have the
s3_bucket and aws_region in the same region.
{
  "dev": {
    "django_settings": "pollsapi.settings",
    "profile_name": "default",
    "project_name": "pollsapi",
    "runtime": "python3.6",
    "s3_bucket": "zappa-staticfiles1234",

    "aws_region": "us-east-2" // aws_region
  }
}
Now let us deploy the app
$ zappa deploy dev
which will show us
$ zappa deploy dev
Calling deploy for stage dev..
Downloading and installing dependencies..
- markupsafe==1.1.0: Using locally cached manylinux wheel
- sqlite==python36: Using precompiled lambda package
Packaging project as zip.
Uploading pollsapi-dev-1548143620.zip (36.2MiB)..
100%|█████████████████████████████| 37.9M/37.9M [00:14<00:00, 2.69MB/s]
Scheduling..
Scheduled pollsapi-dev-zappa-keep-warm-handler.keep_warm_callback with expression rate(4 minutes)!
Uploading pollsapi-dev-template-1548143703.json (1.6KiB)..
100%|█████████████████████████████| 1.61K/1.61K [00:00<00:00, 3.40KB/s]
Waiting for stack pollsapi-dev to create (this can take a bit)..
100%|███████████████████████████████████| 4/4 [00:10<00:00, 2.72s/res]
Deploying API Gateway..
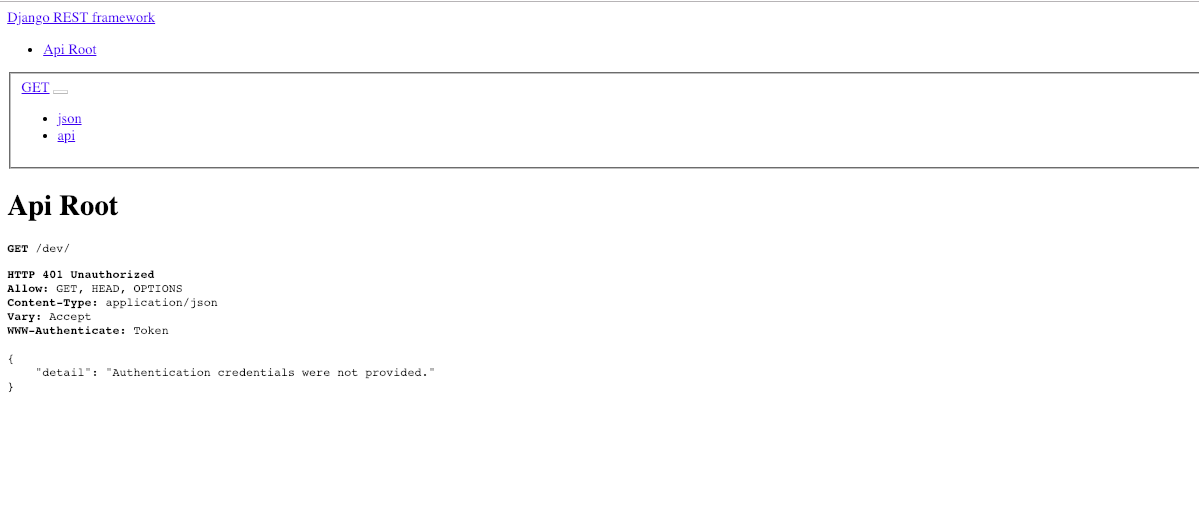
Deployment complete!: https://1astmowyfc.execute-api.us-east-2.amazonaws.com/dev
Now, when we click on the link we will see this

So, we will add the host to our to our ALLOWED_HOSTS in
pollsapi/settings.py
ALLOWED_HOSTS = [ '127.0.0.1', '1astmowyfc.execute-api.us-east-2.amazonaws.com', ]
After this, we have update zappa,
$ zappa update dev
and after updating the app when we refresh the page we see,
The Static files are not available !!
Serving Static Files
For serving static files we use S3 bucket(which we have created earlier).
We have to enable CORS for the S3 bucket, which enables browsers to
get resources/files from different urls. Go to S3 Bucket properties and
then to Permissions, and click CORS Configuration, and paste these
lines
 <CORSConfiguration>
        <CORSRule>
            <AllowedOrigin>*</AllowedOrigin>
            <AllowedMethod>GET</AllowedMethod>
            <MaxAgeSeconds>3000</MaxAgeSeconds>
            <AllowedHeader>Authorization</AllowedHeader>
        </CORSRule>
</CORSConfiguration>
Configure Django for S3
$ pip install django-s3-storage
and also add it in the requirements.txt file.
...
django-s3-storage==0.12.4
...
Now update the settings.py file to add ‘djangos3_storage’_ to
INSTALLED_APPS
INSTALLED_APPS = (
          ...,
          'django_s3_storage',
     )
and also add these lines at the bottom
S3_BUCKET = "zappa-staticfiles1234"

STATICFILES_STORAGE = "django_s3_storage.storage.StaticS3Storage"

AWS_S3_BUCKET_NAME_STATIC = S3_BUCKET

STATIC_URL = "https://%s.s3.amazonaws.com/" % S3_BUCKET
Push the static files to the cloud
we can push the static files by
$ python manage.py collectstatic --noinput
and do
$ zappa update dev
and after updating zappa, let us check by refreshing the page

Setup Serverless MySQL Database
Let us create an AWS Aurora MySQL serverless.
Go to AWS console and go to RDS and create a new Database
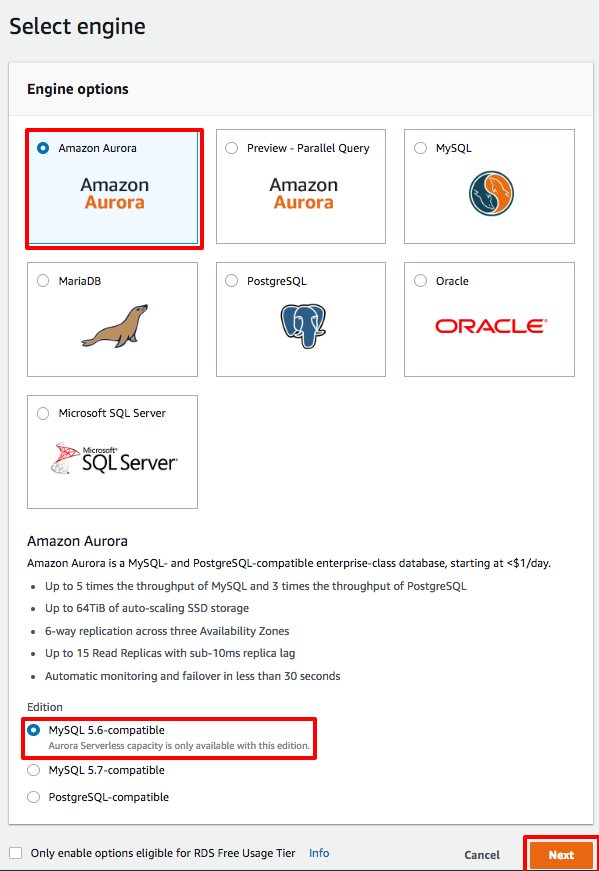
select Amazon Aurora and choose the edition which is Aurora serverless and click next
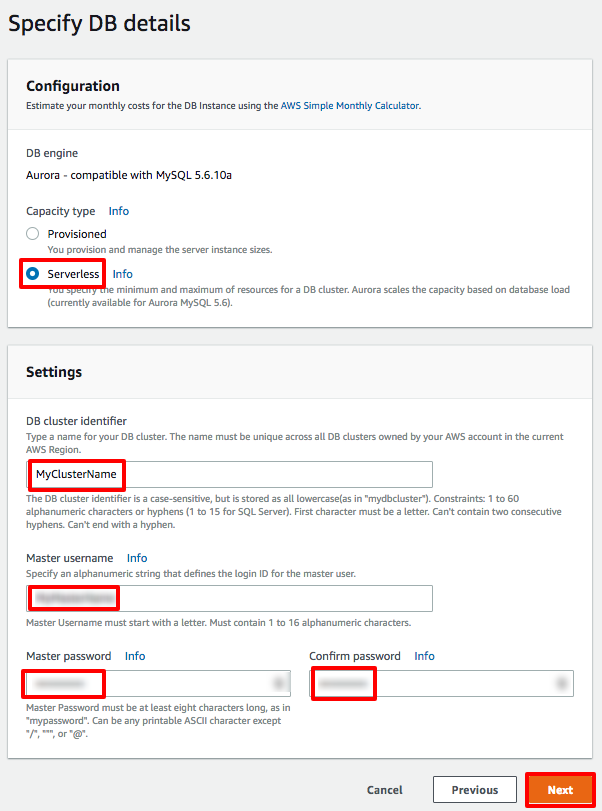
Select the Serverless radio button.
And in DB cluster identifier enter MyClusterName
Set the Master username and password and remember them for later use. And click Next.
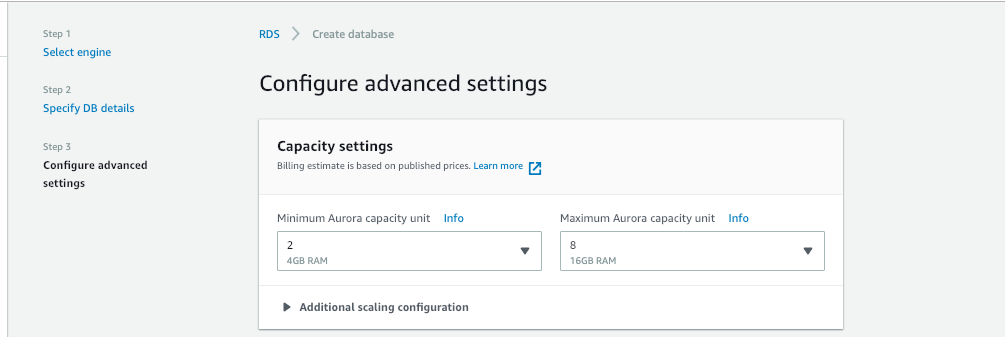 In next page, Configure advanced settings , in Capacity
setting section, select the Minimum & Maximum Aurora capacity units.
In next page, Configure advanced settings , in Capacity
setting section, select the Minimum & Maximum Aurora capacity units.
 And in Network & Security section, under Virtual Private
Cloud (VPC) list, select Create new VPC. Under Subnet group
list, select Create new DB Subnet Group. Under VPC security groups
list, select Create new VPC security group.
And in Network & Security section, under Virtual Private
Cloud (VPC) list, select Create new VPC. Under Subnet group
list, select Create new DB Subnet Group. Under VPC security groups
list, select Create new VPC security group.
And Click Create database
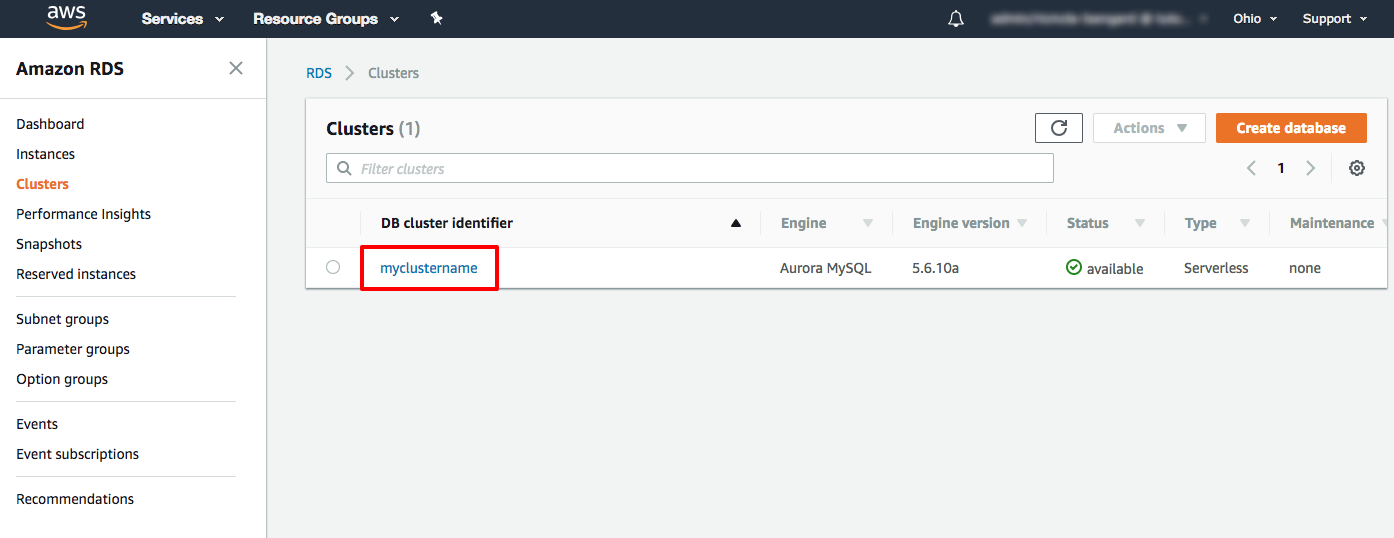 Now our Serverless Database is created, click on the
db-cluster name to see the details
Now our Serverless Database is created, click on the
db-cluster name to see the details
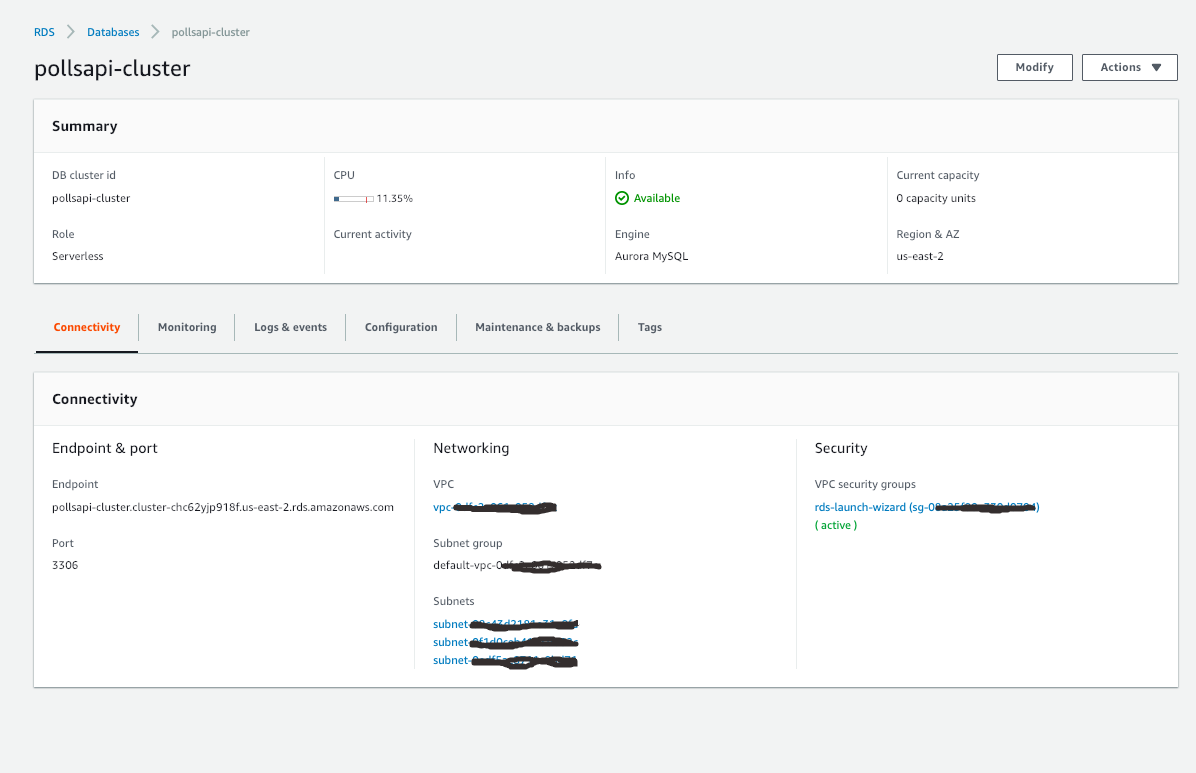
We will use the VPC, Subnet Ids and the security-group later.
Connect Django to MySQL DB
Now our MySQL db is created, we have to link it to our app.
We use mysqlclient to connect django to the MySQl Database Server.
$ pip install mysqlclient
and add it to the requirements.txt file
# requirements.txt
...
mysqlclient==1.3.14
...
Now we need to update pollsapi/settings.py file,
DATABASES = {
    'default': {
        'ENGINE': 'django.db.backends.mysql',
        'NAME': 'pollsdb', # dbname
        'USER': 'polls_admin', # master username
        'PASSWORD': 'pollsadmin', # master password
        'HOST': 'pollsapi-cluster.cluster-chcxxxxx.us-east-2.rds.amazonaws.com', # Endpoint
        'PORT': '3306',
    }
}
Configure Zappa Settings for RDS
Now go to Lambda Management console and click on functions and click on our lambda function(pollsapi)
Then we will go to the configuration page, Under the Network section, in Virtual Private Cloud (VPC)
select the same VPC as in Aurora DB
As Aurora Serverless DB clusters do not have publically accessible endpoints, our MyClusterName RDS can only be accessed from within the same VPC.
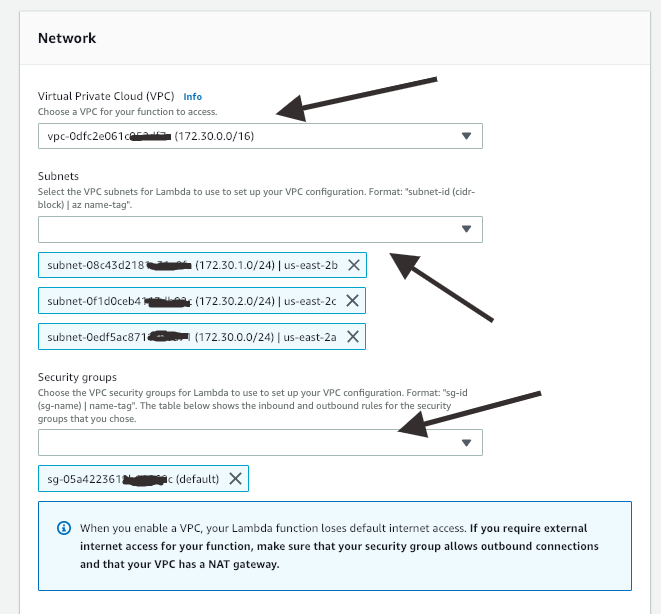
Then in Subnets select all the subnets as in Aurora DB
and for Security groups select a different security group than the one on Aurora DB.
Update Security Group Endpoint
Now we have to update the security group Inbound endpoint.
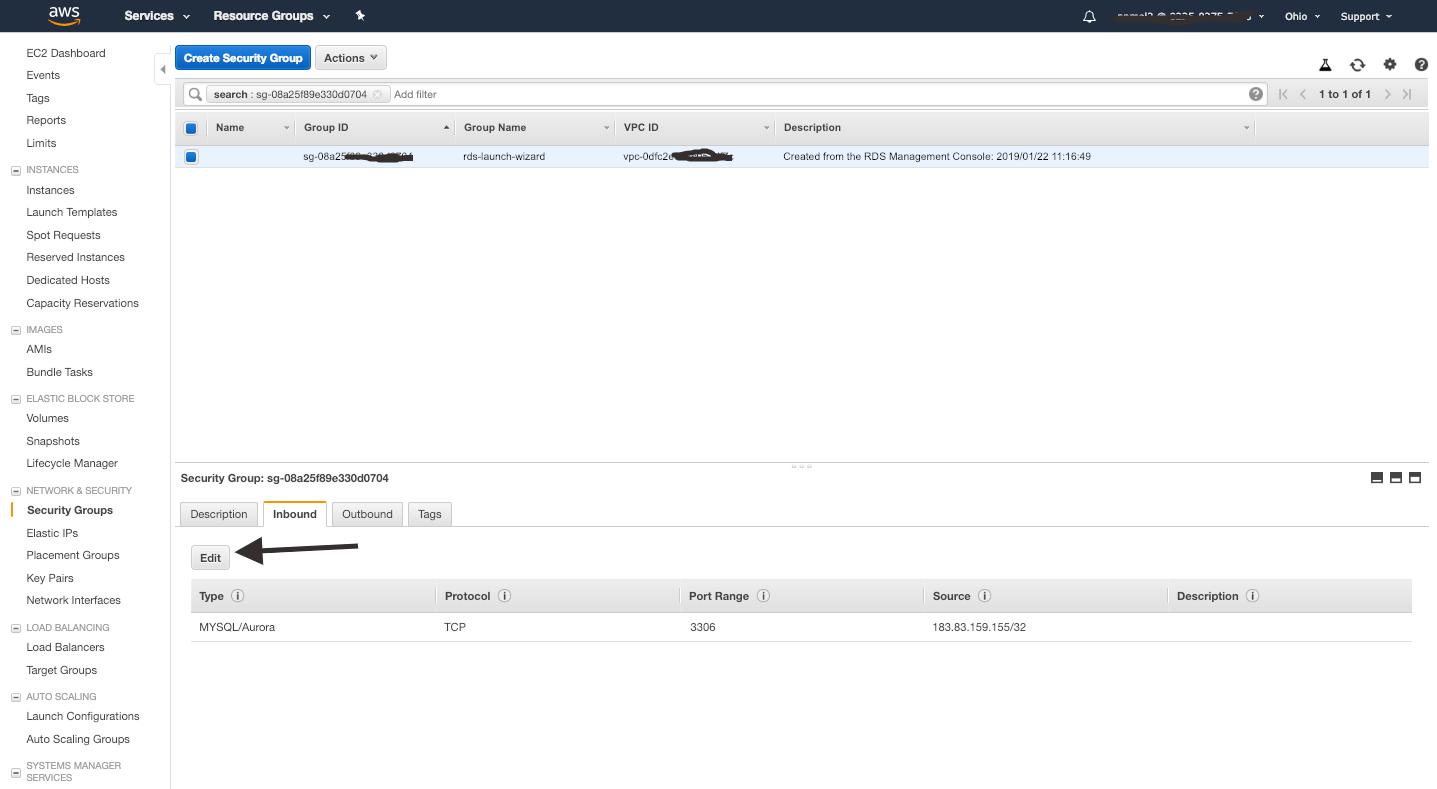
In the RDS console, go to databases section and click on our DB name, which will take us to
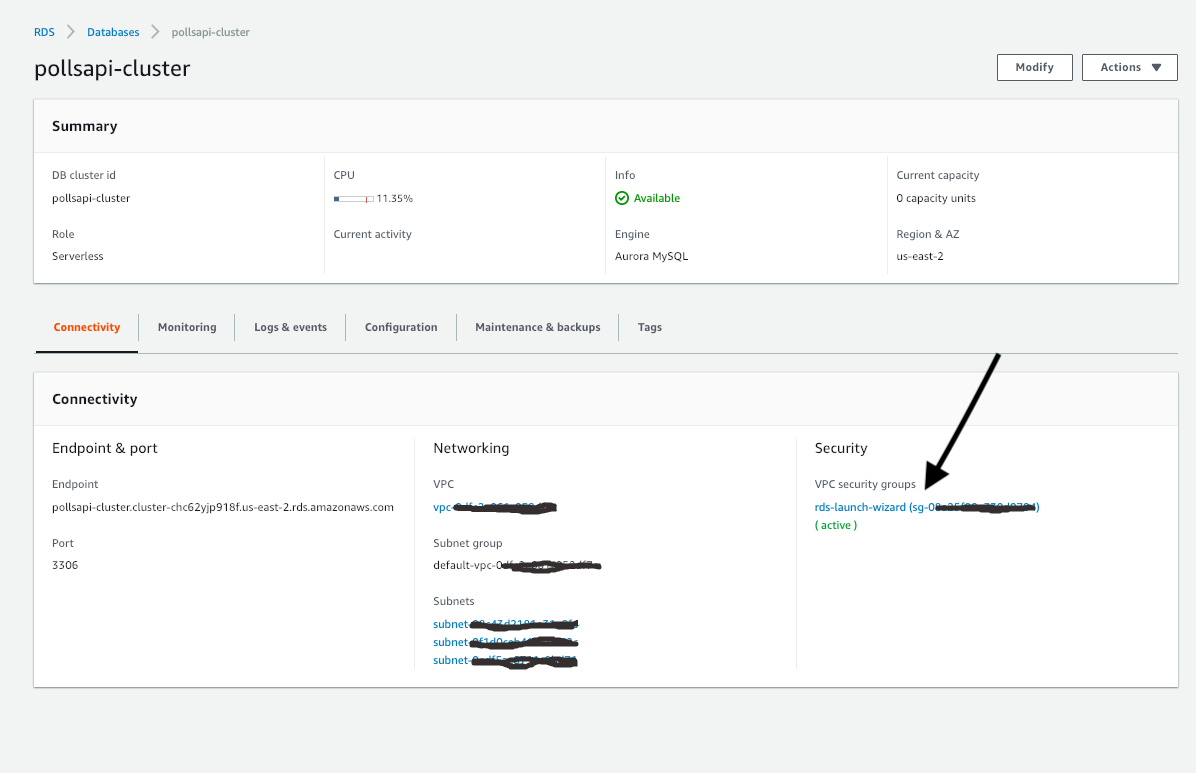
Now click on the security group and we will be taken to the Security Group page
Go to Inbound tab in the bottom and click on the edit button
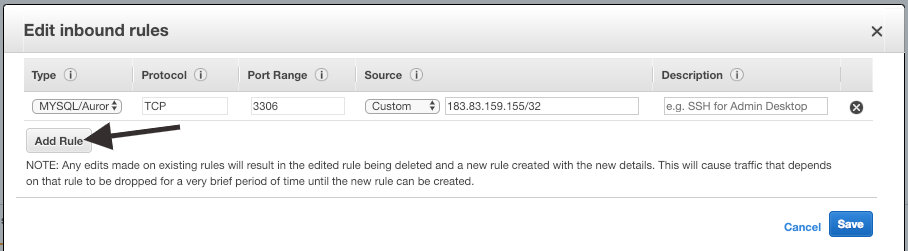
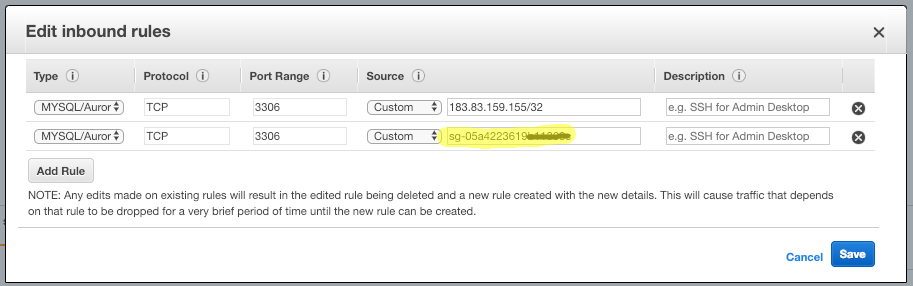
Here click on Add Rule and enter Type as MYSQL/Aurora & in Source enter the Security Group Id of the Lambda function and save it.
Setup the Database
Now let us create a management command our polls app
$ cd polls
$ mkdir management
$ cd management
$ touch __init__.py
$ mkdir commands
$ cd commands
$ touch __init__.py
$ touch create_db.py
# polls/management/commands/create_db.py
import sys
import logging
import MySQLdb

from django.core.management.base import BaseCommand, CommandError
from django.conf import settings

rds_host = 'pollsapi-cluster.cluster-chc62yjp918f.us-east-2.rds.amazonaws.com'
db_name = 'pollsdb'
user_name = 'polls_admin'
password = 'pollsadmin'
port = 3306

logger = logging.getLogger()
logger.setLevel(logging.INFO)


class Command(BaseCommand):
    help = 'Creates the initial database'

    def handle(self, *args, **options):
        print('Starting db creation')
        try:
            db = MySQLdb.connect(host=rds_host, user=user_name,
                                 password=password, db="mysql", connect_timeout=5)
            c = db.cursor()
            print("connected to db server")
            c.execute("""CREATE DATABASE pollsdb;""")
            c.execute(
                """GRANT ALL PRIVILEGES ON db_name.* TO 'polls_admin' IDENTIFIED BY 'pollsadmin';""")
            c.close()
            print("closed db connection")
        except:
            logger.error(
                "ERROR: Unexpected error: Could not connect to MySql instance.")
            sys.exit()
Now let us update zappa
$ zappa update dev
And create the databse using the management command
$ zappa manage dev create_db
which will show us
$ zappa manage dev create_db
[START] RequestId: 5c2de49d-856e-4d75-963d-017a98660XXX Version: $LATEST
[DEBUG] 2019-01-22T14:55:28.387Z 5c2de49d-856e-4d75-963d-017a98660XXX Zappa Event: {'manage': 'create_db'}
Starting db creation
connected to db server
closed db connection
[END] RequestId: 5c2de49d-856e-4d75-963d-017a98660XXX
[REPORT] RequestId: 5c2de49d-856e-4d75-963d-017a98660XXX
Duration: 218.58 ms
Billed Duration: 300 ms
Memory Size: 512 MB
Max Memory Used: 83 MB
We have to migrate now
$ zappa manage dev migrate
Now let us create the admin user
$ zappa invoke --raw dev "from django.contrib.auth.models import User; User.objects.create_superuser('admin', 'anmol@agiliq.com', 'somerandompassword')"
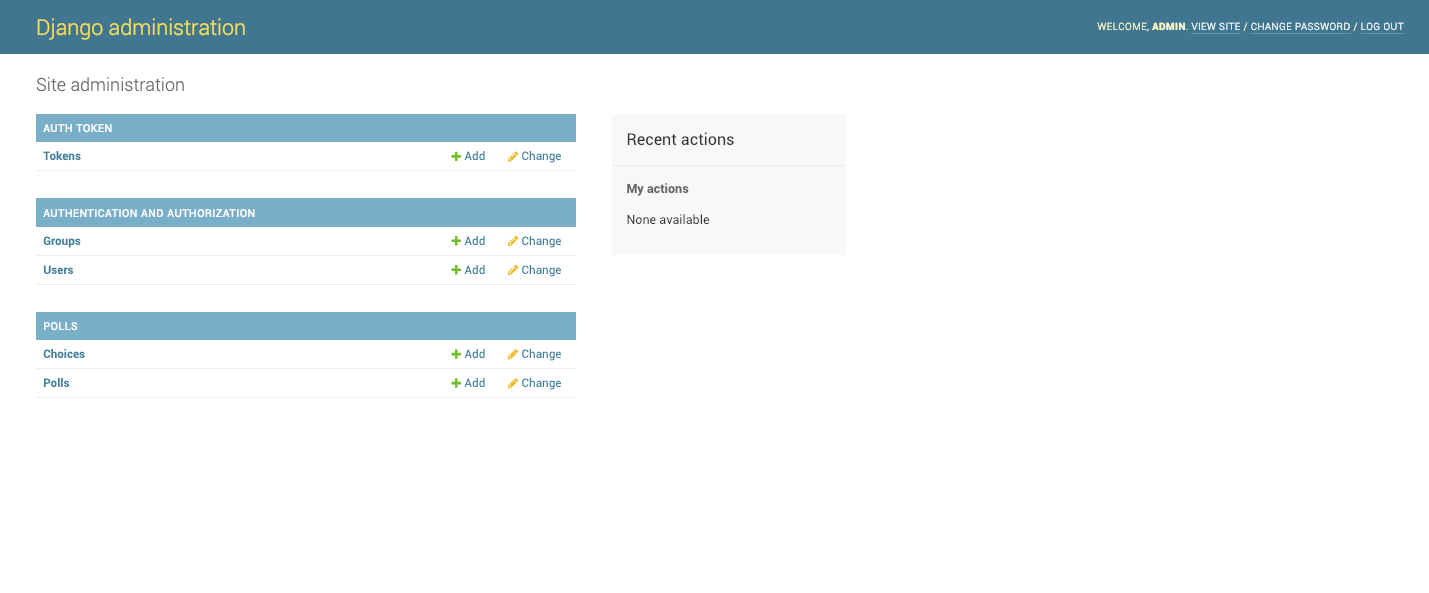
Now let us check by logging in the admin page
*NOW OUR DJANGO APP IS COMPLETELY SERVERLESS !!*
We can check the lambda logs by zappa dev tail